Have you ever been to a really nice restaurant?
I want you to think back to a recent time. Perhaps an anniversary or special occasion of some kind?
For me, I'd have to pick Mother's Day brunch at Fleming's Steakhouse in St. Louis. Easily one of the nicest restaurants in town. Got yours in mind?
Now, what was it that made you think of that restaurant? Was it the food? The atmosphere?
The size of the check? ; )
For average to really good restaurants, it is usually pretty easy to single out one specific thing that they excel at. The service is always warm and friendly at one, while perhaps another has the absolute best Pho you’ve ever tasted. I bet it was a little harder to pick just one thing though at that great restaurant.
Why do the best restaurants stand out then, without necessarily having a stand-out thing they excel at? Because everything’s great.
From the food to the decor to the service, the best restaurants pay attention to every detail. The staff are meticulously trained, and every aspect of your dining experience is top-notch.
In marketing we refer to that as “high production value” - that combination of exceedingly well-done aspects that lets the consumer know, without having to actually tell them, this is going to be a quality experience.
Walt Disney World has the same approach to your day at their amusement park. They want it to be “magical” and they train every one of their employees, and plan every aspect of the park, to ensure you really do feel as though you’re at the most magical place on Earth.
That’s what we want you to achieve with your live broadcasts.
Stephanie Liu and I both believe that if you’re just starting out in your live streaming journey, your best place to begin is with simple live streams using your smart phone or a web cam. Don’t get hung up on gear and technology until you’re completely comfortable in front of the camera, and with your subject matter & audience.
But there may come a time when you want more. When you want to up your game and make your live streams a magical experience for your audience.
That’s what the rest of this article is all about. Being able to use equipment like a DSLR camera to produce truly high-quality video streams is a real differentiator in a world where everyone can go live from their phone. And when your original broadcast is of higher quality, that makes repurposing that video even more effective.
So I’m going to walk you through the equipment that I invested in, how I configured it, and the software I have set up as well.
And for those who want to really bring their A Game, I’ve included some bonus material at the end on how to make sure your audio and lighting compliment the excellent video you’re now creating.
NOTE: As a MacOS and Apple device user since 2008, all of my relevant experience and equipment is within that ecosystem. In fact, one of the great challenges to any Live Streaming setup and guide (and one of the reasons I’m documenting my own journey), is the wide array of different choices and combinations we all have. Please be aware that if you’re using a PC, or choose to use a different brand of DSLR, or some other variation, not everything documented here will be applicable. I strongly recommend you join Stephanie’s Facebook Group, Social Media Strategists, where you can get questions like those answered. However, if you’re using a Canon DSLR like I am, their new EOS Webcam Utility app may be all that you need.
Ready? Let’s get this magical merrymaking started.
Equipment Needed
1. Camera
First and foremost, you need a DSLR Camera. I’m using a Canon EOS Rebel T6i so some of the instructions and steps here will be specific to that model, or Canons in general. Which is, of course, one of the reasons why this technique is so difficult to document. I chose the T6i after weeks of research and determination that it was excellent for streaming high-quality video, while at the same time relatively affordable. You can grab a T6i on Amazon for under $700, and often as part of a kit that includes additional gear and accessories.
2. Large Aperture Lens
Because most Live Streams are broadcast from a stationary position, such as behind your desk, you do not need a lens capable of much, if any, zoom. What you do need is a lens that is going to give you the best quality image possible, even under low light. In fact, you could opt for a “prime lens” - a lens that has no zoom capability at all, as it will give you the best image capture at a fixed position. I chose to go with the Sigma 17-50mm f/2.8 lens as a happy medium (approx. $350). The zoom is sufficient for my needs when not broadcasting from my desk, while still providing a large aperture for light capture.
3. AC Adapter
Second, invest in an AC Adapter for your camera so that the battery doesn’t go out on you during the middle of a broadcast or recording. The adapter plugs into a standard outlet, but the end that goes into your camera resembles the battery pack and is designed to replace it.
PRO TIP: The Canon T6i actually has a little notch on the side that opens to allow the adapter cable to pass out, allowing you to completely close the battery cover. This is necessary as the camera will not turn on without that cover closed.

Canon EOS Rebel T6i with AC Adapter connected
4. Digital Video Cable / Adapter(s)
Third, you’ll need to be able to connect your camera to your computer. Now the Canon Rebel T6i does come with a USB cable that goes from the camera’s mini-USB port out to a standard USB port. Trouble is, newer Macs no longer come with standard USB. So you will either need a USB-to-USB-C adapter, or a docking port of some kind. I use a docking port that gives me standard USB ports, USB-C ports, card readers and an HDMI port.

Canon EOS Rebel T6i with Digital Output Cable connected
(Note that the HDMI port on any Mac is for HDMI OUTPUT. Unfortunately, you cannot do HDMI straight from your camera to your computer that way. For “clean HDMI” you would need to use an adapter like Blackmagic, which I have not yet gotten to work.)
5. Tripod
Fourth, you will need a stand or tripod of some kind for your camera. Ideal would be a tripod like this one that you put on your desk, or a taller one you can stand on the floor, and extend the height to whatever you need. You’re going to want to position the camera so that the lens is somewhat above eye-level. A stack of books may work just as well if you’re on a budget. 😉
PRO TIP: If you’re going to invest in multiple stands, such as a tripod for filming and a monopod for grabbing steady pics of your kid’s activities, stick with the same brand. Good stands have a clip that allows you to screw a mount onto the base of your camera, then easily attach or remove that mount from the stand. You’ll want mounts that are interchangeable.
Software Needed
There are a couple of required software components, and a couple of optional ones. Fortunately, most are free.
Camera Utility Software - Your DLSR camera should come with utility software that makes it easy to connect and configure the camera to & with your computer. In our example here, I’m referring to the Canon EOS Utility which came with my camera.
EOS Webcam Utility - Did you opt for the Canon T6i like we recommended? If so, you can take advantage of the EOS Webcam Utility app which will make your DSLR available as a webcam in most applications. You will not need Camera Live or CamTwist which we’re about to talk about. EOS Webcam is easy to install and streaming services like StreamYard automatically recognize it. Meeting apps like Google Meet work with it as well, though Zoom does not and will require an alternative approach that we’ll get to.
Camera Live - You will need this software installed and running in order to use your DSLR (any Canon) as a webcam. Go to GitHub, click on Download, and download the ZIP file. Install as you would any other software.
NOTE: If you have updated to MacOS 10+ (Mojave) there’s an additional step you will need to take in order to allow Camera Live to work. You will need to disable the new System Integrity Protection and the steps are here.
CamTwist - While some live streaming apps will recognize your camera as long as you have Camera Live running, others won’t. For Skype, Hangouts On Air and some other options, you’re going to need CamTwist. CamTwist is designed to create television-quality productions and provides additional effects and features. Download it for free here (Mac only).
Live Streaming Software - This is another area where your personal preferences will play a large role in determining what you need. If you want to broadcast to Facebook from desktop, you will absolutely need a third-party tool to do so.
Stephanie and I both highly recommend Ecamm as it’s easy to use and a relatively inexpensive up-front cost.
OBS is free but is a little more challenging to learn, so Stephanie has a course for you here.
BeLive.tv is a nice and easy option that is web based, but also comes with a monthly subscription.
Alternatively, you could choose to broadcast using YouTube Live which is both web based and free, but of course it’s also specific to the YouTube platform. If you want to use camera-switching, overlays and other features, you can use Ecamm to broadcast to YouTube. Ecamm also supports broadcasting to Periscope. (Instagram Live does not yet allow third-party tools.)
Another benefit to considering and using Ecamm is that it includes a Virtual Camera option, meaning, once you have Ecamm running and displaying your camera or whatever you wish, you can open another live streaming or video meeting service like Zoom or Facebook Creator Studio and select Ecamm Virtual Cam as your camera. Since Ecamm recognizes most DLSR models from a simple USB connection, it’s a robust approach to using your best camera to create the best possible video feed.
Initial Setup
In addition to installing the software listed above, and putting your camera on a tripod in front of you, there are a few more initial steps you need to take.
First, make sure that your camera has the AC Adapter plugged in, you’ve plugged the digital out cable into a USB port on your computer, turned on the camera, opened Camera Live, and can see your camera there. Like this:

As soon as you do, the view screen on your camera will change from a computer icon to live video of you (I always swing the view finder around to face me / the front of the camera, so I can double-check what’s being captured).
(Or, alternatively, open Ecamm or just use the EOS Webcam Utility, depending on your camera and the purpose of your live.)
You’ll repeat this step every time you go live, but you’ll want to test it in advance and make sure you have everything connected and installed and set up correctly.
Second, check your Camera Focus. On my T6i, I need to set it to Manual Focus (M) as opposed to Auto Focus (AF) because the Sigma lens needs to be positioned and set perfectly in order to focus on my face and allow my background to be slightly and nicely blurred.
This took a little time to perfect. I opened QuickTime Player and went to File -> New Movie Recording and selected EOS Webcam Utility to pull my DSLR feed into my monitor and see how the video looked. I’d then get up and adjust the lens field of view and depth accordingly. Essentially you’re telling the lens how wide of a view to grab (in my case, I prefer to exclude extreme stage left so as not to see my office door and light switch), and the exact distance between the lens and the subject - my head.
This just involves getting up, making changes, sitting down, and then repeating as often as needed. If you have an assistant who can make the adjustments or sit in your space while you make adjustments, this will go faster.
Third, if you’re using one of the live streaming options that needs CamTwist in order to see your camera, you’ll need to know how to use CamTwist.
Open the CamTwist app and click on View and then Main Window. This is where you can apply some interesting effects to your video stream, but it’s also where you start something called a “Syphon Server.”
In the Step 1 column click on Syphon and then click the Select button below it. Once you do that, the far right Settings column will change to include options for a Syphon Server and here you will want to select Camera Live. If all of that works, when you fire up an app like Skype or Appear.in, you should now see “CamTwist” as an available camera to select, in addition to your normal webcam.

Before moving on, click on CamTwist Preferences and set FPS to 30 and video size to 1920×1080. You can go higher if your camera supports it. Restart CamTwist to save those preferences.
Finally, you may have some configuring to do within your Live Streaming Software. Most will allow you to start a show “out of the box” but again, if we want to create a magical experience, why not take advantage of options like overlays, lower thirds, and other nice touches?
Taking the time to add those kinds of elements will help you differentiate your broadcast from everyone else, and make a great impression on all your new viewers.
Going Live
STEP ONE: Turn on your DSLR and switch to Video Mode. If your EOS Camera Utility software automatically started, you can close it. You can also change your EOS Utility settings to not open automatically every time you connect or turn on your camera - it’s not needed for these steps. (Note there’s a difference between EOS Webcam Utility and EOS Camera Utility.)

STEP TWO: Fire up the Camera Live app. You can minimize this and right-mouse click to Close when you’re finished with your video.
STEP THREE: (If Required) Fire up the CamTwist app. Select the Syphon server and set it to Camera Live as explained above.
FINAL STEP: Fire up your Live Streaming Software and verify that your video looks magical.
Optional Next-Level Production Quality
Congratulations on making it this far! This has been a pretty technical adventure and when you start dealing with equipment of this nature, it’s only going to get more technical the further you go.
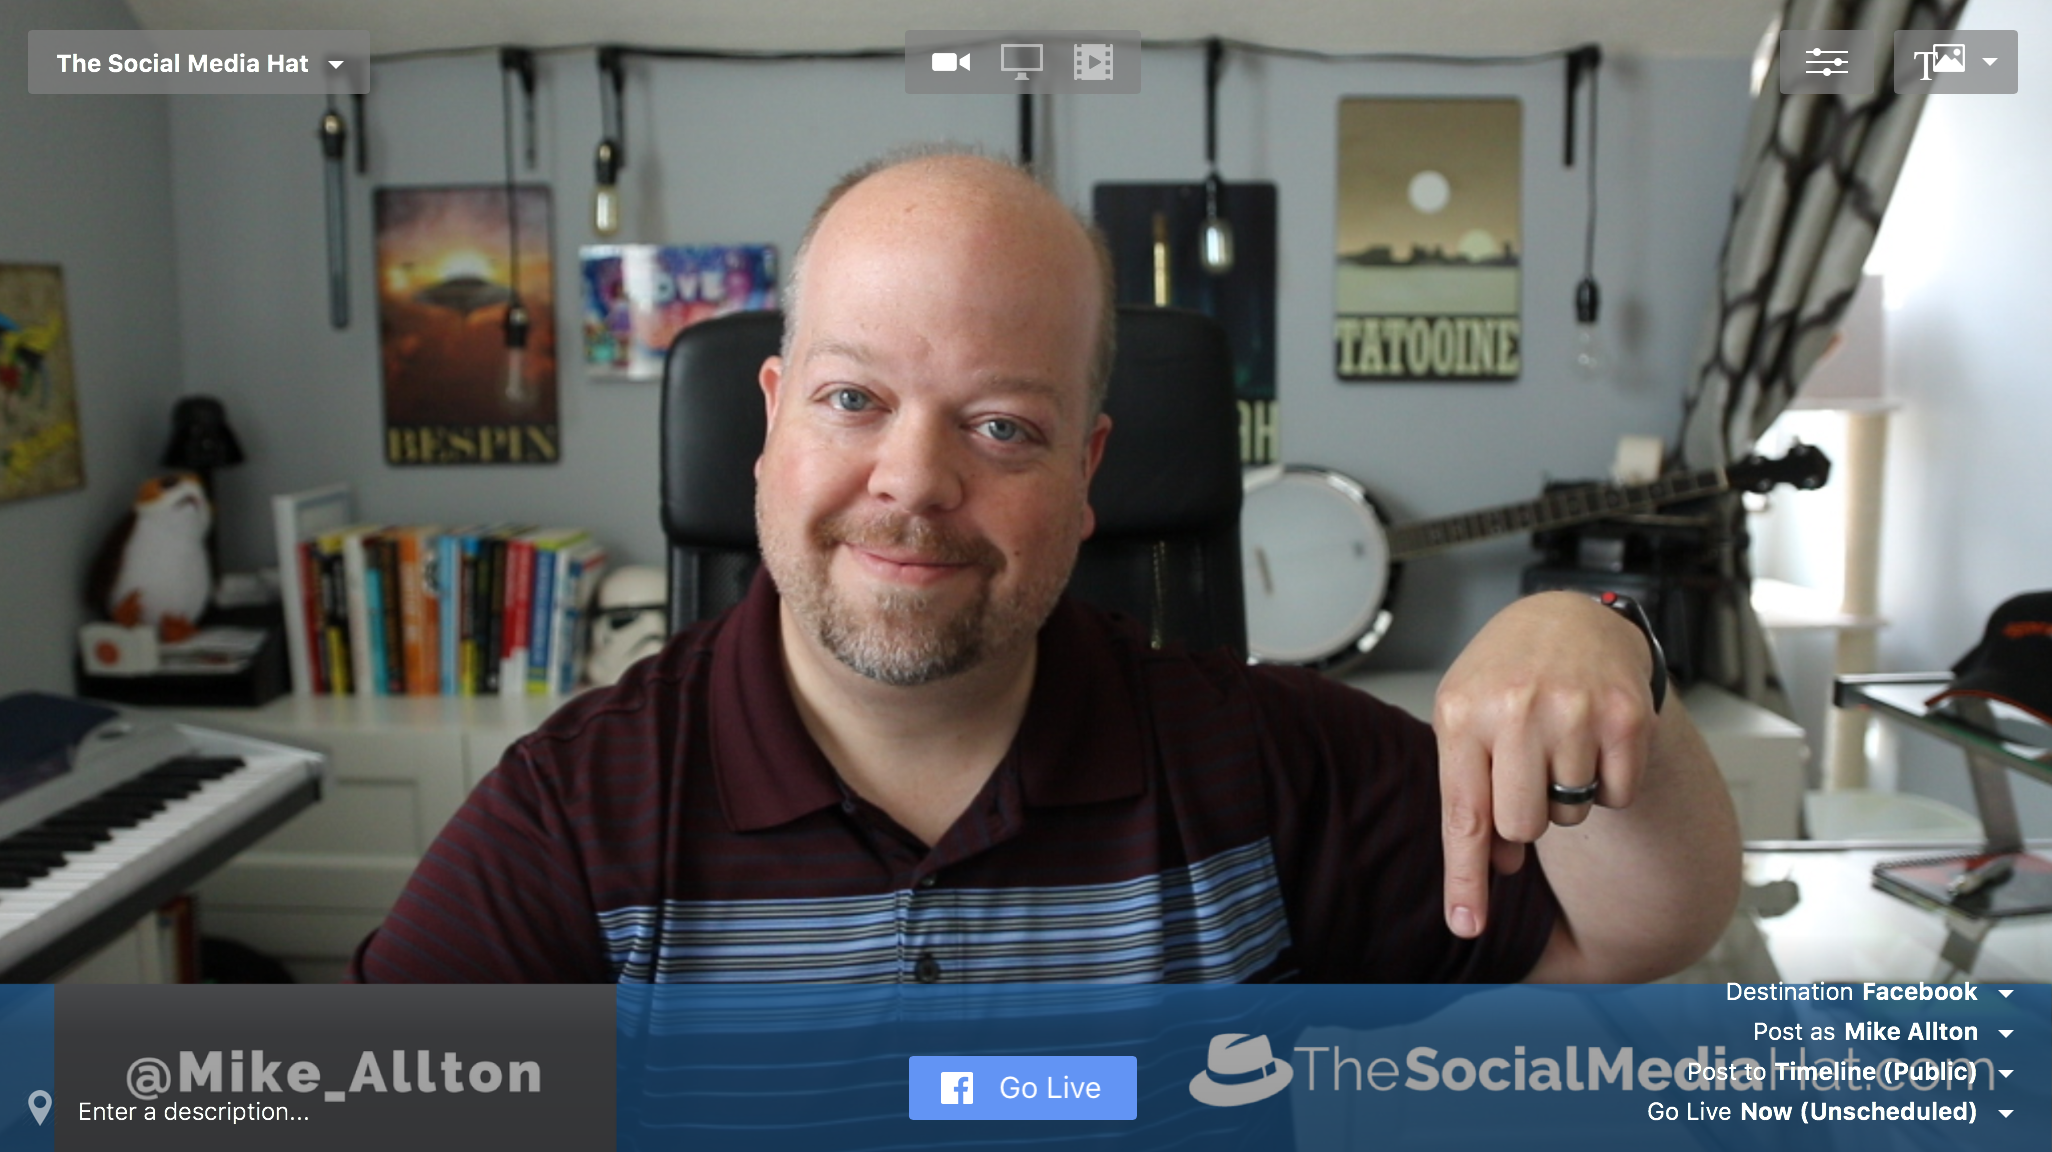
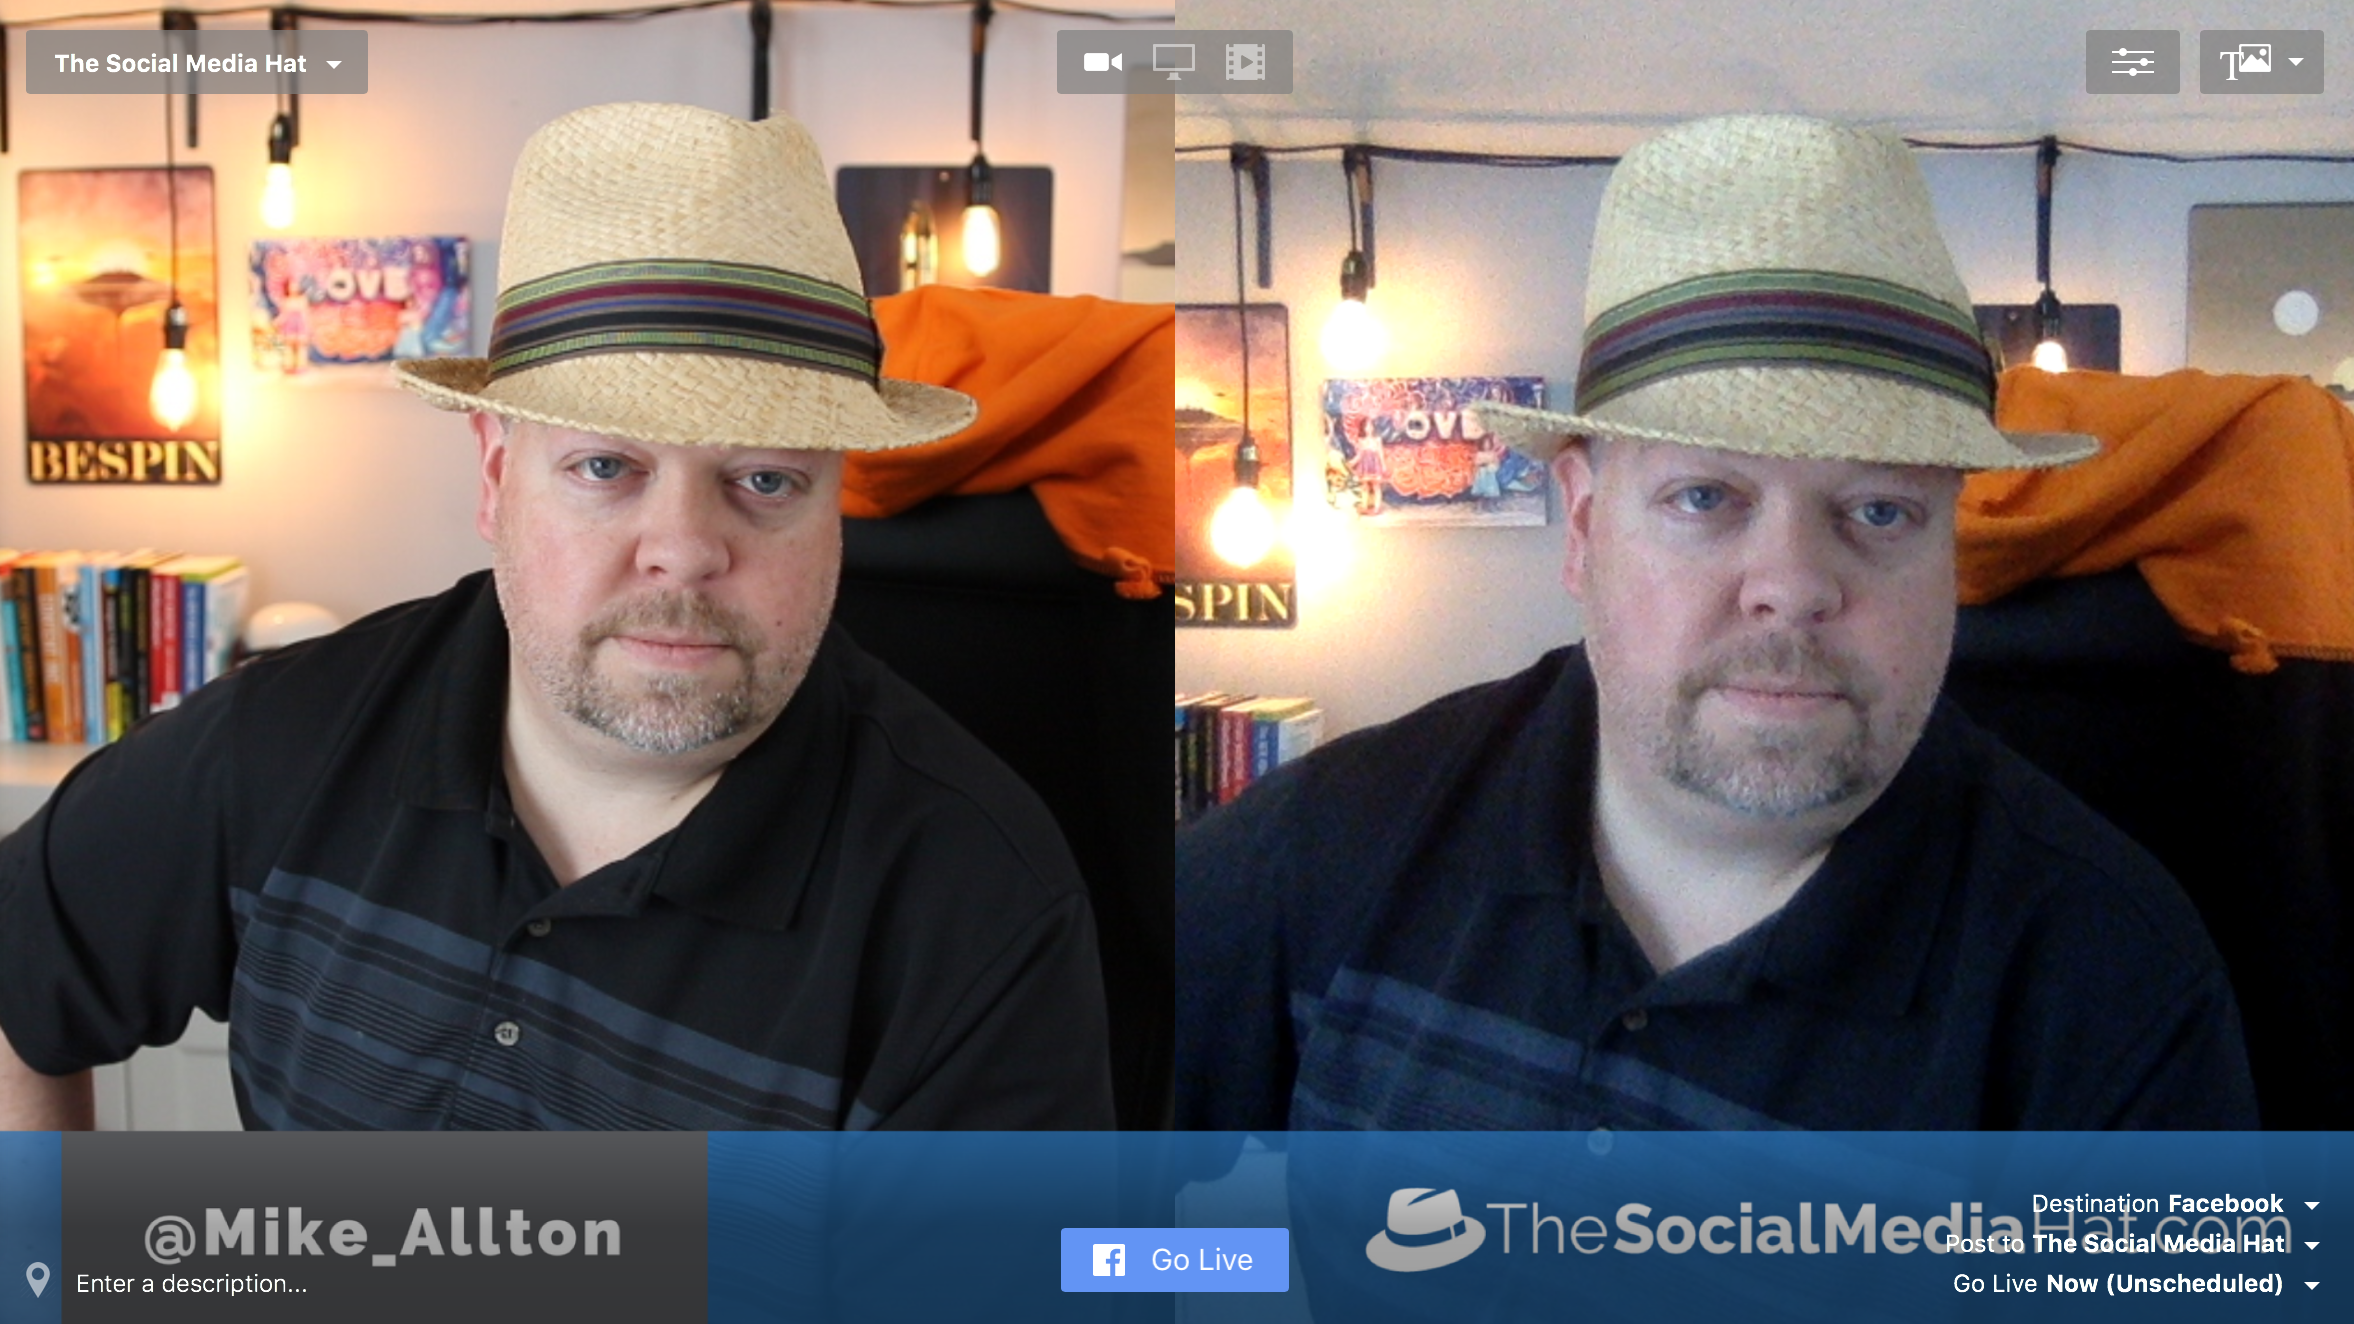
But it’s worth it. The whole point of this exercise is to raise the production value of your live video. The difference between a DSLR and your standard webcam is staggering.
But wait, there’s more to a great live streaming broadcast than just a good video camera! Let’s take a closer look at two other essential elements: Lighting & Audio.
LIGHTING
The first, and potentially most important element aside from the camera itself, is lighting. You have to have good lighting for any camera to be effective. The ideal here is to have directed, diffused umbrella lighting that you can position for maximum impact. One on either side of you, lighting both sides of your face equally, plus another light behind you to reduce shadows and add contrast.
Like this:

Umbrella light kits are actually pretty inexpensive and can be found here. I have a series of Edison bulbs hanging along the wall behind my normal broadcast position, so I don’t need additional back lighting. But I have two umbrella lights on either side of my desk facing me. I have a power strip with individual switches so I can turn both of those lights on quickly and easily.
If your filming location gets a lot of natural light, or you have plenty of existing lighting, that’s great! Just test it so you can prepare accordingly.
The key to great lighting is the bulbs. I now use two floor lamps that are decorative and look fantastic in my office, but when I turn them on they produce daylight-level awesomeness at 4500 lumen thanks to these bulbs. I have both floor lamps and my rear Edison bulbs on smart sockets so I can turn them all on or off with an app on my iPhone.
Be very mindful of the light that you have behind or from the sides. Too little light can create shadows, while too much light can divert the camera’s focus from your smiling face. Take the time to test different placement of your lights as well as different combinations of what’s on or off until you feel like you have the best possible video quality.
AUDIO
While we could create multiple articles on how to achieve the best audio, and which microphones to use, I’m going to share with you my relatively-inexpensive setup and best tips. Again, it’s a bit more work to get everything configured correctly, but when a professional Rock-n-Roll DJ and podcaster tells you your audio is amazing, you know you’ve gotten it right.
Equipment
Microphone: for digital audio, you have two choices of microphones to consider: USB or XLR (or a model that has both) - these are the type of cable connector used to connect your microphone input. USB will plug directly into your computer and be recognized by your computer as an audio source, so it’s what most live streamers use. We’re going to opt for XLR though, as I’ll show you in a moment. I’m using the ATR-2100USB from Audio-Technica which has both USB and XLR cable options, but it’s the XLR cable that’s connected.
Boom Arm: because the ideal position of the microphone is going to be just a few inches from your mouth, pointed towards your mouth, you’re going to want a boom arm that can be swung and adjusted to fit your position. They’re readily available and inexpensive.
Pop Filter: this is a good idea as it helps keep sudden breaths of air from hitting the microphone which result in pops of sound. These are also very inexpensive.
Audio Mixer: this is where the magical, professional-grade audio quality happens. I’m using a Behringer Xenyx Q1202 USB. Here, the USB feature is critical as we do ultimately need to be able to pipe the audio into a computer, and that’s only possible via USB. Note that you’ll likely need to purchase a cable for your mixer! The Xenyx mixer USB output is a “Mini Display Port” so you’ll need a USB cable that goes from Mini Display Port to whatever type of USB port you have available.
Setup
Plug your microphone’s XLR cable into the back of your mic and into the #1 microphone jack on your mixer. Make sure that all of your Gain & Level knobs are adjusted down to 0 and that your EQ and Fade knobs are at detent - usually centered where you’ll feel a slight click when turning.
Plug your mixer into an AC outlet and then plug it into your computer.
Adjust your audio dial settings.

Here’s how to adjust those settings to suit your microphone and your normal volume of speaking.
Keep your main mix at 0.
Set your gain to 0.
Set your level to 0.
Begin speaking normally into your microphone and raise your level, then your gain, all the while watching your audio indicators.
In the image above you can see the two red lights to the right that indicate the power is on. Below those are a series of green, then yellow, then red lights. Those will light up according to the volume of your speaking. Keep raising the level and gain until your normal speaking lights up all of the green lights, but rarely the yellow. Consistent yellow and red indicators reflect too high gain.
Once you’re happy with the volume, adjust the EQ. The Behringer is equipped with a “British EQ” though that means different things to different people. Each input channel on your mixer board includes dials for treble, midrange and bass, allowing you to adjust the sound quality and frequencies of each input.
Traditional UK recording of the 60’s and 70’s tended to favor midrange, while US studios favored the treble and bass. Therefore you can adjust these to suit your own preferences!
I recommend firing up Quicktime and doing a series of test recordings. Have a bit of text ready to read, start a new audio recording and say that text aloud into your microphone as you would normally. Listen to the recording, make a small adjustment to your EQ, and repeat.
Once you’ve finished configuring your mixer to give the kind of audio you’re looking for, you’ll need to make sure that it’s the default audio input source every time you go live.
Go into your System Preferences, click on Sound, select the Input tab, and make sure you see “USB Audio CODEC” - this is your mixer and your new audio input source!
Select USB Audio CODEC
Each time you use a Live Streaming app or web service, check to make sure your correct audio input is selected.
Most of the time, whatever service you’re using will have the correct input already, but check to be sure just in case!
Final Advice
One of the challenges for me was determining all of the cables and adapters and available ports to get all of this working, particularly since I use a MacBook Pro with just two USB C ports - one of which is used for power! My docking station gives me an additional 2 standard USB ports and that’s really all I needed - one for the camera and one for the mixer, without having to use any extra adapters.
So it may help you to write all of this out, complete with the specific cables and connections your devices need. (It might save you from buying a new microphone like I did which you can’t use because it doesn’t have XLR out, and the mixer doesn’t have USB in.)
Do spend time considering how your background looks as well and make sure that it’s not too cluttered or distracting. It won’t do to spend this much time and money creating high quality video, only to have a background that screams unprofessional.
Finally, throughout this entire journey, keep your ultimate goals and vision in mind. There are bound to be additional challenges - hours spent troubleshooting some setting or unresponsive component - but it helps to keep a positive attitude. That attitude is easier when know that everything you’re doing is worth it.
As I mentioned earlier, make sure that you’ve joined the Social Media Strategist Group on Facebook so that you can show off your latest setup, and get answers to your most pressing questions.
ABOUT MIKE ALLTON

Mike is a Content Marketing Practitioner - a title he invented to represent his holistic approach to content marketing that leverages blogging, social media, email marketing and SEO to drive traffic, generate leads, and convert those leads into sales. He is an award-winning Blogger, Speaker, and Author at The Social Media Hat, and Brand Evangelist at Agorapulse.
As Brand Evangelist, Mike works directly with other social media educators, influencers, agencies and brands to explore and develop profitable relationships with Agorapulse.
