The number one search engine is, obviously, Google. And right behind Google is YouTube.
Now, don’t get me wrong, Facebook itself isn’t too shabby. With over 2 billion monthly users, Facebook is powering more searches than Bing and Yahoo! combined. But if you’re following all my other advice to create regular Facebook Live Video shows and broadcasts, how does that help you when it comes to search?
In other words, how do you get your Facebook Video content to come up in search results for people to find?
It’s a lot easier than you thought. And in fact, I’m going to share with you a 3-step process that will not only get your video content into the top 2 search engines, but it will also result in you nabbing 3 result spots in Google!
Like this:
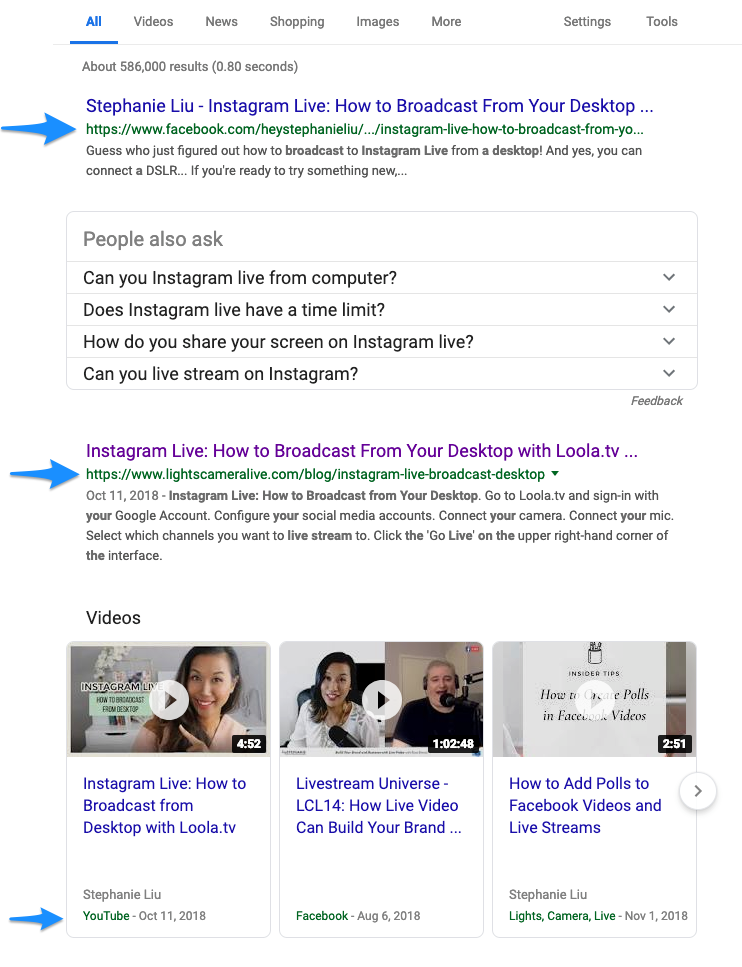
Check that out! The same video content - a Facebook Live I did about how to broadcast to Instagram from desktop, showing up three times at the top of the search results.
Blog Post
YouTube
Facebook
BOOM
I’ll walk you through how it’s done step-by-step:
Step One: Public Facebook Video Post
For me, it all starts with a Facebook Live Video. I’ll go Live to my Facebook Page, either interviewing a guest or streaming solo to talk about a particular topic, and once that’s done the video is now a video post on my Page.
But here’s the thing: my Page and my posts to my Page are all PUBLIC.
In order for your Page and content to appear in Google search, Google has to be able to “see” it and index it, and Google can only access publicly accessible content.
So once you’ve posted a video or concluded a broadcast, and it is publicly available, Google will be able to see it and eventually will index it. I say eventually because without assistance, you’ll have to wait until Google’s robots find and scan your content. There are a couple things you can do to speed that along, which we’ll get to in a moment.
Before you do anything else though, now is a good time to optimize that Facebook video for search! What do I mean by that?
Make sure that your video has a Title that’s very relevant to your topic and descriptive. You can see in the example above my video title was, “Instagram Live: How To Broadcast From Desktop.” Whenever possible you want to use a title that asks or answers a question people are actually searching for.
Use a detailed description. Even if you don’t like to write that much, it’s worth your time to create a great description before you go live so that people will want to tune in, and then after your live, edit that description to say more about what you talked about in the video! The more you say here, the more information you’ll provide Google about your video content.
You can edit your video at any point to include or update that information, as well as add to existing playlists on your Facebook Page, or even make it a Featured Video if you want new Page visitors to see that video first. The more people who see and engage with your video, the better!
Once you’ve got this in place, your Facebook Video can now potentially show up in Google search results!
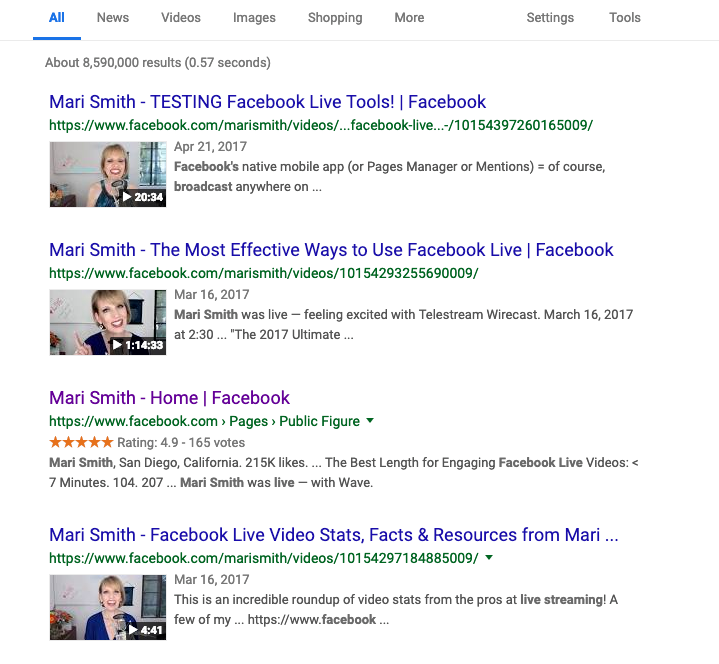
Here’s another example of how Facebook videos can appear within Google search results from friend and Facebook expert Mari Smith:
Step Two: Upload Video to YouTube
Next, we want to go ahead and take advantage of the #2 search engine. Not only will this get our video content into YouTube, but as you’ve seen, Google shows YouTube videos in search results, so this will potentially be your second search result.
So how do you get your Facebook video into YouTube?
It’s easy.
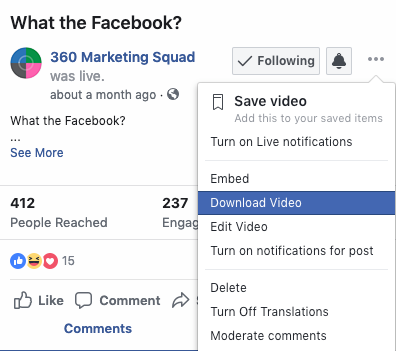
First, go to your Facebook Video and click the three dots in the upper right corner to access the post menu, and click on Download Video. Like this:

This will download the complete video as an MP4 file to your computer.
Next, log into your YouTube account and your YouTube Channel (if you have more than one), and click on the Upload Video button. Like this:

Drag your video file into the upload field or click to select it from your computer, and YouTube will begin uploading it.
The Title will default to whatever your filename is and, like as not, Facebook chose something ridiculous, so change that to reflect your preferred Title.
Copy & Paste your description from Facebook, and then add relevant tags. If you have a Playlist started on your YouTube channel, you can add this video accordingly.
Finally, before you publish, check the thumbnail. YouTube may or may not choose something good from the video. And in fact, if you created a nice graphic to promote the Facebook Live, you can use that graphic here and just upload it as a custom thumbnail (recommended!).
Once you have those fields set, just click on Publish. Even if YouTube isn’t finished processing, you can tell YouTube to publish the video when it’s ready.
And that’s it! Now you’ll have another potential search result in Google Search.
So what’s the third step?
Step Three: Embed Video On A Blog Post
The last one is my favorite simply because it’s easy AND has tremendous long-term value.
Remember, you’ve already done the hard work of taking the time to plan, promote and host a Facebook Live video. Either you or your guest has delivered all kinds of great information. But let’s make sure that visitors to your website have access to that information.
At a basic level, you’re going to create a new blog post on your site and embed your Facebook Video. That’s easily done through the same exact download menu, just the menu item one up: Embed.
That will give you a little snippet of code that you can copy and paste into a blog post.
Or, if you’re using WordPress 5.0 and have Gutenberg’s block feature installed, all you need to do is add an Embed Facebook Post block and paste in the link to the video. Either way works.
But what else do you put into the blog post?
This is where I employ my secret weapon: Designrr.io.
I could just paste in the video description and use the video title as the title of the blog post. But with Designrr, I can also include a full transcript in moments!
You can learn more about Designrr here.
So now you can publish a blog post with title, video overview (description), and a full transcript that is quickly and automatically generated for you.
Once you publish that blog post, you have a great piece of content that’s easily shared to all the social networks, email lists, and referred back to whenever a reader or follower has a related question.
BONUS: Give Google A Kick In The Rear
I mentioned earlier there are a couple ways you can make sure that Google indexes your posts, so let me share those with you now.
First, you should make sure that your Blog and website is automatically generating an XML Sitemap, and that you’ve provided Google with that URL.
An XML Sitemap is just a page that lists all of your pages and blog posts, and does so in a plain text way. It’s used by Google and other aggregators to see when sites publish new content and quickly scan it. If you’re on WordPress your XML Sitemap can be generated by the free plugin Yoast SEO.
Once you find that link, log into your Google Search Console account (or create a new account if you don’t already have one), and add a new sitemap, pasting in the link.
And voila! Each time you add a blog post it’ll be indexed by Google very quickly.
Second, you can tell Google that you want it to index a URL immediately within Search Console if it’s on your website. If it’s not, as in the case of the Facebook post, embedding that on a blog post that is indexed will do the trick.
If you want to verify whether Google has indexed a video or blog post, just open Google and use an “exact match title search” which means you put in the title of the video exactly as it exists. If the title is still a bit generic and there are lots of other results, add your name or business name.
And that’s when you’ll start to see results like this!
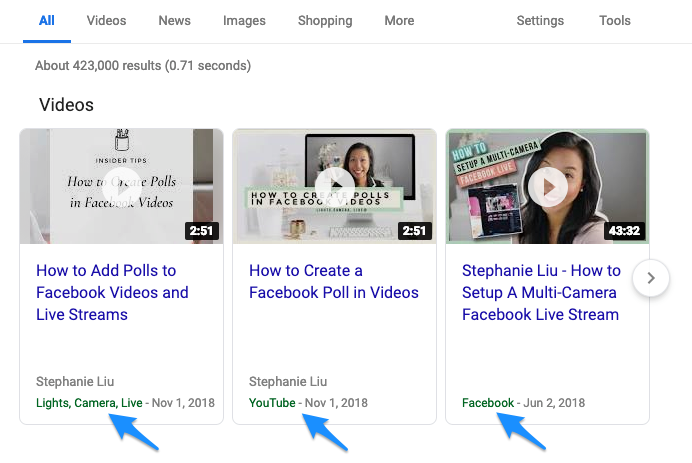
I now have blog posts and YouTube videos and Facebook videos appearing in search results.
And what’s particularly awesome about this is that the “Videos” portion of search results always appears at or near the top of search results. My videos can then outrank other websites that perhaps have ranked for years, but because I’m giving my audience content in video form, my content is placed higher.
If you’re already creating Facebook Live Videos, give this a try and let me know in the comments how it works for you, or what questions you have.
If you aren’t yet creating Facebook Live Video, START HERE.

